
Guide to Posting, Tagging and Hashtagging on Social Media
For various campaigns, such as Blood in Pop Culture, we may ask our donors to post pictures on social media, tag SBC and use our hashtag. However, navigating how to post on various platforms and how to make that post visible to SBC can be challenging for some users. For this reason, we have developed a handy, evergreen guide for posting publicly, tagging us and using our hashtag on Facebook and Instagram. We hope you find it useful and that you soon tag us in some donation photos, which we love to see at any time!
Note that the below screenshots and steps are developed based on a mobile IOS device. However, steps will be similar on a computer.
For the purposes of the below article, please refer to the glossary at the end for definitions of any unknown social media terms.
How to Make a Public Post on Your Facebook Wall
- Open up Facebook. On your home screen, your “feed,” at the very top, there is an editable status update box that displays your profile image on the left-hand side and says, “What’s on your mind?” Click into the “What’s on your mind?” box.
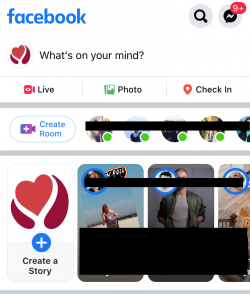
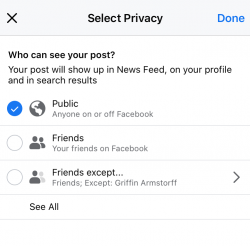
- Directly under your name, you have the option to choose that your post be “Private” or “Public” (see glossary). If you want SBC to be able to see what you post, make sure the dropdown is set to “Public.” If you simply want to post a text update, you can type directly in the box; then skip to step 5. If you want to include an image with your post, click the top option underneath the text box that says “Photo/Video.”
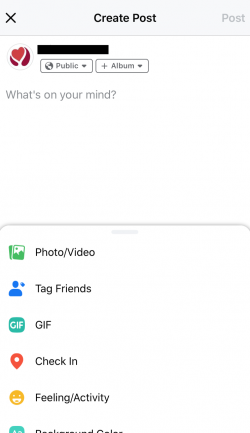
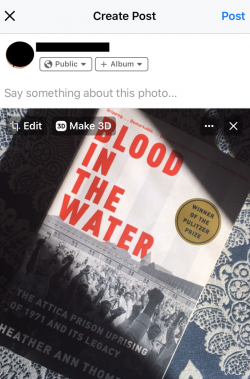
- If you are on your phone, this will open up a box that shows recent photos taken on your device; if you are on your computer, it will default to pulling from your computer files. You can change where Facebook is looking for your designated photo by using the dropdown under “Camera Roll.” Then select the image you want, as seen below, and tap “Done.”
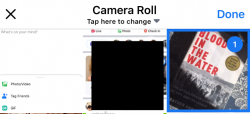
- Once you select the image, a preview will show. From this screen, you can edit your photo using the option on the top left of the photo preview, or delete it and choose a different photo using the X on the top right of the photo preview.
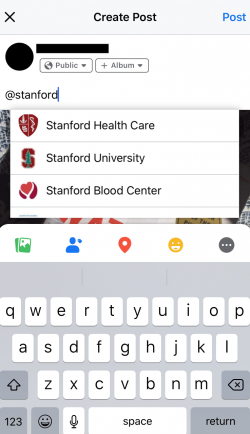
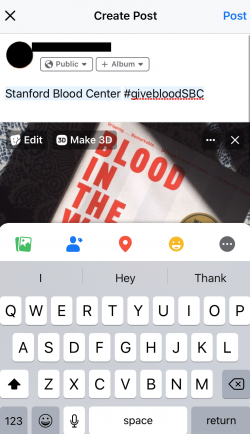
- Tag Stanford Blood Center by typing “@stanfordbloodcenter” (our account should pop up for you to select). This will alert us that you have mentioned us in your post.
- Include our hashtag by typing “#givebloodSBC.” This will make your post searchable by people who are looking for content related to SBC.
How to Make a Public Story on Facebook
- Open up Facebook. On your home screen, your “feed,” near the top, underneath the status update box, you will see your profile image enlarged with a plus sign and the words “Create a Story.” Click this option.

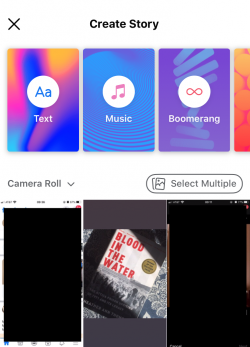
- This will open a screen that allows you to add text, music, etc. If you are on your phone, this will also show recent photos taken on your device; if you are on your computer, it will default to pulling from your computer files. You can change where Facebook is looking for your designated photo by using the dropdown under “Camera Roll.” Then select the image you want and select “Share to Story.”
- On this next screen, you will need to add your tag and hashtag by clicking the “Text” button from the options on the left-hand side of the image.

- Tag Stanford Blood Center by typing “@stanfordbloodcenter” (our account should pop up for you to select). This will alert us that you have mentioned us in your post.

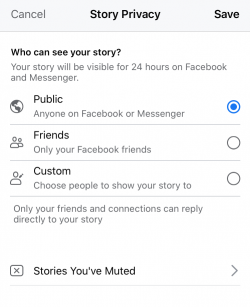
- Include our hashtag by typing “#givebloodSBC”. This will make your post searchable by people who are looking for content related to SBC. Now, to make sure your story update is public (meaning anyone can see it by clicking on your profile), click the gear titled “privacy” in the bottom left of your screen.

- Select “Public,” tap “Save,” and then on the next screen, select “Share to Story” to post.
How to Make a Past Post on Your Facebook Wall Public
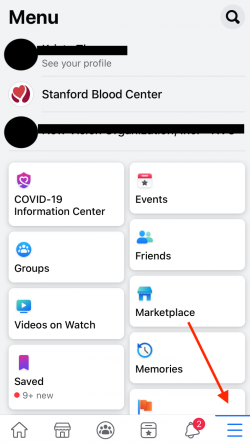
- Start on your profile page. On your mobile phone, you can find this by selecting the menu option on the far right at the bottom of your screen, as indicated by the red arrow, then clicking your profile image and name at the top of the screen. On a computer, find your profile by simply selecting your name and profile image, which is next to “Home” on the top blue menu bar.
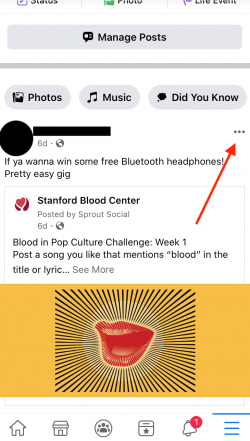
- Scroll down and locate the post you wish to make public. Near the top of the post, choose the three dots, as indicated by the arrow below.
- Select “Edit Privacy.”
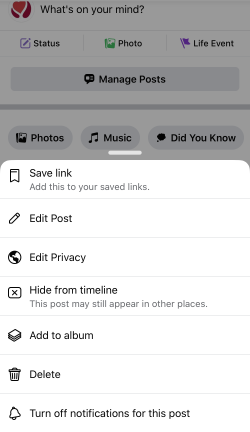
- Select “Public,” and tap “Done.”

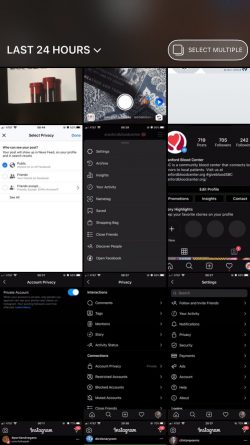
How to Make Your Profile (Posts and Story) Public on Instagram
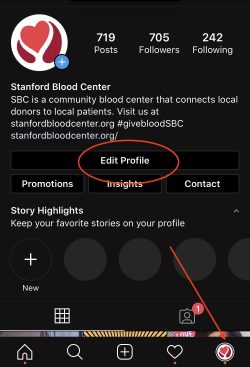
- Select your profile image on the far right of the bottom menu bar. From the next screen, select “Edit Profile” underneath your profile image, name and description near the top/middle of the page.
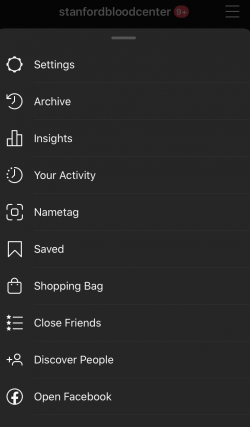
- Click “Settings.”
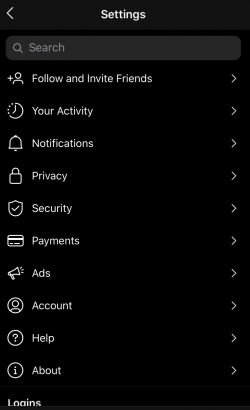
- Click “Privacy.”
- Under “Connections,” select “Account Privacy.”
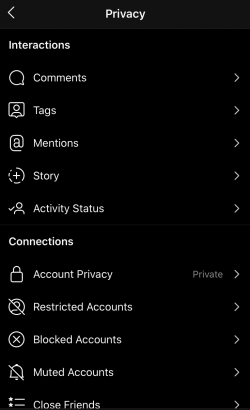
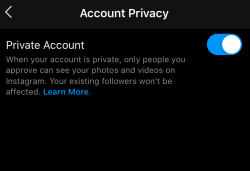
- If this screen says, “Private Account,” click the sliding toggle to change your account to “Public Account.”
How to Make a Post on Instagram
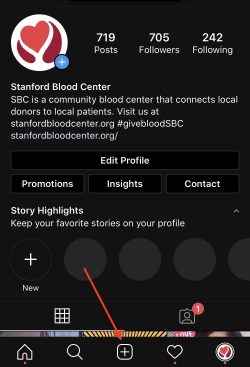
- Select the middle option from the bottom menu, which looks like a square with a plus sign in it, as indicated with the below arrow.
- This will open up your camera roll. Select the photo you would like to post and click “Next.” You can then select a filter for our image, or simply click “Next” again.

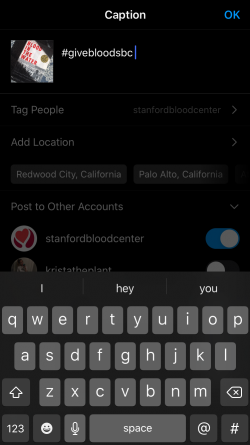
- Click “Tag People,” tap anywhere on the image and type “stanfordbloodcenter”, then select our account. The result will look like the below. Click “Done.”


- Add a hashtag by typing “#givebloodSBC” in the caption box at the top of the screen. Then select “OK” in the top right corner to post.
How to Post a Story on Instagram
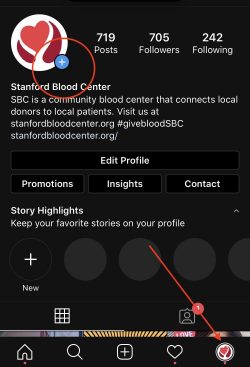
- Select your profile image on the far right of the bottom menu bar. From the next screen, tap the blue plus sign on your enlarged profile image at the top left of your screen.
- This will open your camera. If you want to take a picture in real time, simply click the white button on the middle bottom of the screen. Then skip to step 4. If you want to select an image from your camera roll (i.e., a photo you have already taken), choose the small square on the bottom left of your screen. It should show a small preview of the most recent image on your camera roll. This will open your camera roll.

- Select the photo you want to post.
- Tag SBC by tapping anywhere on the image and typing “@stanfordbloodcenter” and selecting our account image that pops up. You can drag this text around the image to position it where you’d like.

- To add our hashtag, click anywhere on the screen and type “#givebloodSBC”. You can drag this text around the image to position it where you’d like.

- To post to your story, select your profile image that says “Your Story” under it on the bottom left of the screen, as indicated by the red arrow.

GLOSSARY
- @: When you type “@” on Instagram or Facebook, this is an indication to the platform that you are tagging another account. Instagram/Facebook will take whatever text immediately follows the @ as the profile name you are looking to tag (e.g., @stanfordbloodcenter). Note that on Instagram, your @ should be followed by the person’s handle, which would not have any spaces in it; but on Facebook, the @ should be followed by the person’s name, which will likely have spaces in it.
- #: When you type “#” on Instagram or Facebook, this is an indication to the platform that you are using a hashtag. Instagram/Facebook will take whatever text immediately follows the #, without spaces, as the hashtag name (e.g., #givebloodSBC).
- Camera roll: A catalog of photos taken on your phone.
- Facebook wall: This is your Facebook profile page that shows only posts you have made and posts others have tagged you in.
- Feed: This is your scrollable home page on Instagram and Facebook where posts from everyone you follow/have friended appear.
- Follow/Friend: Once you follow someone on Instagram or friend them on Facebook, their new posts will appear on your feed.
- Handle: This refers to someone’s account name on Instagram. Handles start with @ and are used to tag others (e.g., @stanfordbloodcenter).
- Hashtag: Hashtags are indicated by the # sign. Hashtags are used on both Instagram and Facebook as a way to indicate key themes and relevant content. If someone were to search a specific hashtag on a social media platform, it would show all public posts that have used that hashtag. For example, if you searched “#blooddonation” on Instagram, it would show all public photos where the author used the #blooddonation in their caption. Note that there can be no spaces in a hashtag name.
- Private post/account: On Facebook, a private post or account means that only your friends can see your posts and/or account details. On Instagram, a private account means that individuals have to request to follow your account, and only once you accept them can they see your new and previous posts.
- Public post/account: On Facebook, a public post or account means that anyone can see your posts and/or account details. On Instagram, a public account means that anyone can see your previous posts without following you, and that they do not need to request to follow you but can do so automatically if they choose.
- Status update: On Facebook, this typically refers to a text post but can include media.
- Story: On Instagram and Facebook, stories are posts you can make that are accessible to others when they click on your profile image. Stories are unique because they disappear on their own after 24 hours, unlike regular posts, which stay on your profile indefinitely (until you delete them).
- Tag: Tagging someone on social media is a way to link to their account on your post. Typically, this is done to indicate that you are with another person or that content is relevant to them. This also notifies the other party that they have been mentioned in a post. To tag someone, type “@” and their name or handle on Facebook or Instagram, respectively.
Still have questions? Reach out to us at support@stanfordbloodcenter.org.