
Fun, Educational Children’s Activities to Celebrate STEAM Day 2020!
This Sunday, November 8, is national STEAM Day. STEAM Day, which recognizes the importance of exploring science, technology, engineering, the arts and mathematics, is a great opportunity to encourage children to explore their interests and find STEAM-related topics that get them excited about learning and innovating.
To help you celebrate STEAM Day this year, we’ve come up with five fun activities for children at all ages to do to help them focus on the science of transfusion and transplantation medicine! It’s never too early to plant the seed that donating blood (when they’re old enough) is vital to supporting the community.
-
Make a Tasty Model of Whole Blood
This activity, which is adapted from a Quirkles article, involves building an edible model of blood to show the various components.
Materials
- Blood makeup infographic (to use as reference in your discussion)
- Bowl
- Spoon
- Red Hots, red Skittles or a red candy of similar size that your little one likes to eat!
- Red sprinkles
- White sprinkles
- Corn syrup
- Red food coloring
Steps
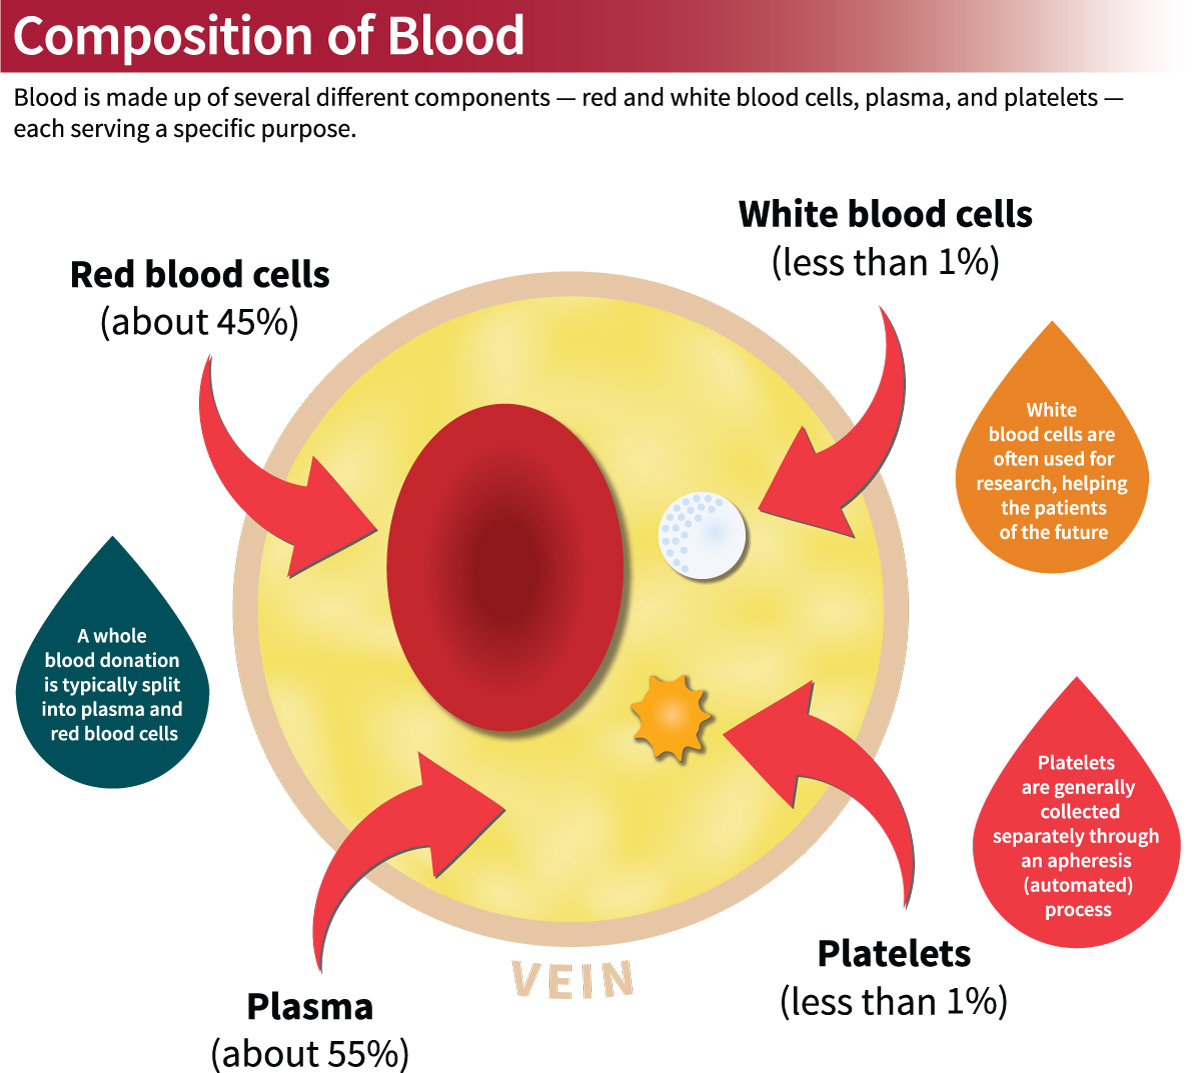
- Add a significant amount of your red candies to the bowl. You’ll want to explain that these represent red blood cells, which transport oxygen and nutrients throughout the body and remove carbon dioxide and other waste. In terms of blood donation, they are often needed by patients who have lost a lot of blood due to trauma (like a car accident) or in surgery. Since red blood cells make up 45% of whole blood, you’ll want to add a good amount.
- Next, you’ll add the red sprinkles, which will stand for platelets. Platelets are made in bone marrow and are used to help stop bleeding. In addition to being useful for patients who are losing blood, they are also commonly used to help cancer patients undergoing chemotherapy, who may lose platelets as an effect of treatment. Platelets only make up less than 1% of whole blood, so don’t add too many!
- Thirdly, add your white sprinkles, which represent white blood cells. White blood cells are used to fight off viruses and bacteria and keep you healthy. While white blood cells are not commonly transfused into patients, they are useful for researchers who use white blood cells to study how the body would react to different treatments and therapies for things like cancer. Like platelets, they also make up less than 1% of whole blood, so you’ll want a fairly small amount of those, too.
- The last main ingredient is corn syrup, which stands for plasma. Plasma is what the rest of the cells float in and is mostly water (about 90%). Like platelets, plasma is used to help control bleeding; however, plasma is made in the liver and uses different mechanisms to control bleeding, so they aren’t interchangeable with platelets for patients. Plasma is used for patients who have significant blood loss, burn victims and other patients with specific diseases. This naturally yellow liquid makes up 55% of whole blood, so you’ll want to cover all your other “cells” in the bowl with it.
- Lastly, you’ll want to add in your red food coloring and mix it all up. You can note that, while plasma is yellow when it is separated out, the hemoglobin (iron) is what makes whole blood red. Not all animals, as you’ll see from another activity mentioned here, have red blood. Some even after green, yellow, blue, purple and white blood.
-
Play a Card Matching Game About Blood Color
If you have been with Stanford Blood Center for about a year, you may remember seeing our partnership (Give Good) with The Tech Interactive, a hands-on museum in San Jose that encourages children to explore STEAM topics. As part of that partnership, Stanford Blood Center was invited to host a temporary exhibit on blood, and one of the below is one of the most popular activities it featured!
Information on blood color is listed on each animal card, so if your goal is education, be sure to go over each card with your child as it comes up during game play.
Materials
Download this PDF, and be sure to print double-sided, so that on one side of your paper you have a heart mark, and on the other you have either a picture of an animal or a blood bag. Cut out each rectangular card.
Gameplay
This game can be played with one or more players. The goal is to match animal cards with blood bag cards of the right color.
Flip all of your cards over so that the side with the heart is facing you. Mix them up, and then spread them out on your playing area so that the heart side is facing up.
On your go, flip over one card. It will show either an animal or a colored blood bag. If it is an animal, the text on the card will tell you the color of that animal’s blood. Leave that card face up and flip over a second card. If your first card was an animal, you want your second card to reveal a blood bag that is the same color as the animal’s blood; if your first card was a colored blood bag, you want your second card to reveal the animal who has that blood color. For example, if you first flip over a giraffe, for your second card, you are trying to guess where the red blood bag is.
If you are correct, you get to remove both cards from the playing area and keep them in a separate pile for yourself with all of your other matches. If you are incorrect, you must make sure all players have had a chance to see the front of these cards, then flip them back over. Only two cards can ever be facing up at a time.
If you are playing by yourself, you will continue to flip two cards over at a time until you have correctly matched all the cards. If you are playing with others, take turns flipping over two cards at a time until all cards have been claimed.
The game ends when all the cards have been correctly matched and removed from the playing area. If you’re playing with other people, whoever has the most cards in their own pile (meaning whoever matched the most cards) at the end of the game wins!
-
Play a Card Game About Blood Types
To help your child learn about blood type compatibility (e.g., which blood types can accept blood from/donate to which other blood types), play a game that encourages your child to think about who their blood and others could be supporting.
Materials
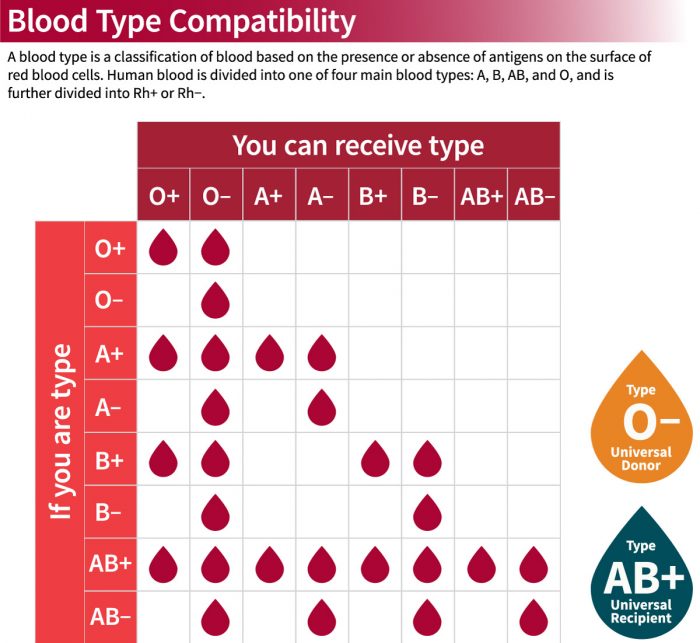
- Download this blood type compatibility chart as a reference guide.
- Make two sets of flashcards. Each set will contain eight cards, each listing a different blood type:
- A+
- A-
- B+
- B-
- O+
- O-
- AB+
- AB-
- Note: In total, you’ll have 16 cards, with two of each blood type.
- Secure a pen and paper for scorekeeping.
Background
First, you’ll want to talk to your child about blood types and the blood type compatibility chart. Make sure they understand the basics:
- While several blood group systems are used to type your blood, ABO is the most important.
- Your ABO type is based on the presence or absence of two antigens (A and B) on the surface of red blood cells. There are four ABO types: A, B, AB and O.
- Your blood type is also determined by Rh status, meaning whether or not your blood is positive or negative for Rhesus D antigen, something that is passed down from your parents.
- If a person is not transfused with the right blood type, it can lead to severe health complications. Based on a person’s blood type, they only recognize certain antigens, and will attack those they do not recognize, which can cause damage to a patient’s health if they’re transfused the wrong type.
- Note that the chart you will use in this game is for red cells; plasma can be transfused without regard for Rh factor (so any A , positive or negative, can give to any A; any B, positive or negative, can give to any other B, etc.; and AB can go to anyone), and, generally speaking, blood type does not matter for receiving platelets.
Gameplay
Go through the blood types one by one (either by showing your cards, or saying them aloud). Take turns being the “patient” and the “donor.” You will start each round with the patient selecting a different blood type (though blood types can be asked more than once), and it’s the donor’s job to determine what blood type they have to have to support that patient.
For example, if you are the patient, you might say, “My blood type is A+” and lay out the A+ flash card. The donor would need to respond with “I can help if my blood type is O+, O-, A+ or A-” and lay out the correct matching flash cards. If the donor is correct, they get a point. Then they would become the patient and ask you, as the donor, what blood type works for the blood type they choose, and on and on, switching back and forth.
Be sure to check after each round if the donor is correct by using the compatibility chart. The first person to get to 10 points (or more, if you’d like to play longer) wins!
We hope you find these games fun and educational. Do you have any other resources that help your child learn about blood science and donation? Let us know on social media!